News
Easy DIY Projects: How to Create Storage Space by Boarding Your Loft
Author Chigwell Building & Joinery
Date 28/03/2017
The Simple Cost Effective Home Storage Solution
Storage is always a problem no matter what size home you live in. There’s never enough space to store all the clutter and items you simply refuse to part with.
In most cases, your loft provides the perfect opportunity to create useful storage space that is easily accessible, dry and cost effective, meaning you can store away items out of sight and get access to them only on the odd occasions when they’re really needed.
The great thing about boarding your loft as it does not usually require planning consent and for even the most basic of DIYers, it’s a fairly easy task to undertake. Here’s how to board your loft using standard MDF loft boards or alternatively, 18mm plywood sheets.
Loft Access
Before you even lay a single board, you firstly need to ensure you have adequate loft access to bring the required boards up into the space. Most loft hatches are fairly tight so measure the widest point across the diagonal length of the opening and ensure any boards you buy or not wider than this width.
Standard loft boards usually measure between 320mm to 600mm in width, so choose only those that will fit through the hatch.
Measuring the Floor Space
Next you need to work out the floor space you want to cover with boards. In most cases, it’s not practical to board the entire loft space, especially under the eaves as the roof pitch makes the space practically unusual for storing items, let alone walking.
So measure just the areas you feel will be used for either walking on or storing items that you need to gain access to. Then simply measure the length and multiply that by the width, giving you your square meter coverage requirements.
Now all you need to do is shop for an adequate amount of boards to cover that area. Remember to overcompensate to cater for cutting odd pieces that may use partial boards and create wastage.
Ways of Boarding
There are two ways to traditionally board a loft.
In the past, most home DIYers would attach loft boards directly onto the roof joists, covering up the loft insulation. Nowadays, this is not recommended as this places strain on the joists but also, compresses your roof insulation, making it far less effective.
There are no rules or regulations to suggest you cannot take this approach if this is your preferred route however, most experts now agree this is not the ideal solution.
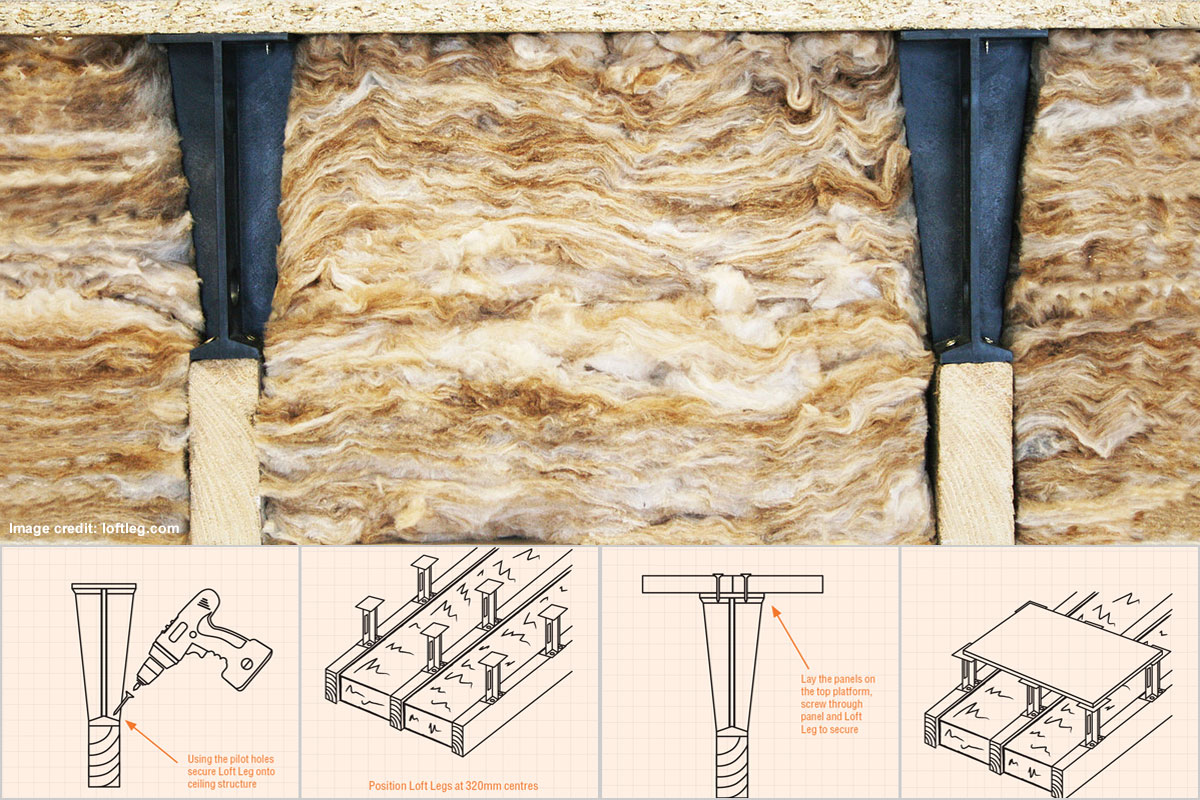
Instead, most agree that using loft legs is better as this allows for ample room above the loft insulation and creates a sturdy raised base onto which you can build your loft floor. It also means that access to electrical cables and pipework is far easier for contractors if the need arises.
Installing Loft Legs
Most loft legs are very easy to attach to the existing roof joists. Simply roll back any insulation between the joists temporarily and screw the legs directly into the timber using 30mm screws and space them 400mm apart in either direction, ensuring they are accurately spaced. This will ensure your loft boards sit exactly as they were intended on the legs and will give you a perfect sturdy finish.
Installing the Loft Panels
Start at one corner and lay your loft panels directly on top of the loft legs at 90 degree angles to the direction of the ceiling joists. Then when in place and laid square, attach them to the loft legs using the same 30mm screws.
Lay them in rows going across the width of the roof first and then move onto the next row as you go.
Safety First
Remember, when laying loft panels, always ensure you only step onto the existing roof joists and the rest of the roof will not take your weight.
Always wear gloves as roof joists are unfinished timbers with splinters and wear safety glasses when cutting, drilling or nailing boards to the loft joists. If in doubt, ask for help as roof spaces can be very tight so cutting and placing boards is much easier with a spare pair of hands.

7 Common Practical Uses for Plywood
Author Chigwell Building & Joinery
Date 13/03/2017
What is plywood and how is it made?
Plywood is an engineered timber product made from layers (or plies) of thin sheets of wood veneers, which are glued together under pressure at high temperature to form a thicker, stronger and more flexible flat sheet.
The logs used to make each sheet are prepared by steaming or dipping into hot water and are then fed into a lathe, which peels the log into the thin plies of around 1mm - 4mm thick, which are used to form each layer of each sheet.
It’s a widely used building material due to its many useful properties as well as its economical cost.
High quality plywood sheets tends to be very strong and does not warp or crack under changes in atmospheric moisture, thus making it a reliable material for a wide variety of applications.

How this versatile timber material can be used for various applications
Plywood is widely manufactured as a softwood and hardwood, and come available in various grades of finish, depending on its intended use.
Here’s just a few examples of how plywood is used and why it is such an excellent choice of material for such uses:
1. Exterior Wall Sheathing
Common wall construction on new homes, especially in North America consist of a 2 foot x 4 foot or 2 foot by 6 foot frame skinned in exterior-grade plywood sheathing.
Plywood panels are used to fastened to each stud together to add strength and prevent vertical or horizontal shifting, keeping the frames structure intact and square.
This technique forms a structure that performs well under high wind and during earthquakes due to its flexible properties.
2. Interior Walls
Certain types of plywood are good for wood paneling or framing interior stud walls.
In most cases, the plywood will not be visible for the final finish however, some highly finished A-graded plywoods are very good for facing inwards and can painted or stained to give a stunning natural wood finish.
3. Roofing and Flooring
Plywood is commonly used to sheath roofs and as a subfloor on many internal flooring projects.
On floors, plywood panels may include tongue-and-groove edges that slot together to allow them to carry the required load without shifting or movement whilst on roofs, they can act as a very durable and suitable skin prior to laying tiles, metal or a membrane.
Plywood is excellent for both applications.
4. Other Construction
It’s not uncommon to find eaves and soffits covered with a plywood skin or made completely from ply.
Some plywoods are made specifically for use as a siding product to appear similar to reverse board and batten siding.
Builder contractors also commonly use plywood boards for constructing detached garages and sheds, for temporary floors and concrete forms.
5. Furniture
Plywood can be a very practical and cost effective material for building furniture.
In situations where one side needs to to look nice, a high grade plywood can be used whilst for the rest of the structure, a lower grade finish is fine.
Plywood is suitable for almost any furniture project imaginable within reason, so it’s not uncommon to find it used in custom built dressers, wardrobes, built in media centres, shelves, bookcases, console tables… in fact, the list is practically endless!
6. Cabinets
Plywood is great for making cabinet carcasses for kitchens, bedrooms and more.
A good quality plywood is more than suitable for use on backs and sides of cabinets in most cases and is a far superior material to traditional chipboard or MDF as it lasts longer, doesn’t split and is far more durable.
7. General Projects
Due to its versatility, plywood is great for many other home projects from building skateboard ramps, to rabbit hutches to doghouses.
Home DIYers love plywood as it is ideal for building useful items including workbenches, sawhorses, simple step-stools and storage bins.
In fact, we’ve published a few easy DIY projects of our own using plywood sheets.
Why not check some of them out and see just a handful of the many practical ways you can use plywood in and around the home?
It’s a great product and is available in a wide range of thicknesses and grades, ranging from exterior with exposure to moisture to interior dry application.
It always produces an excellent, strong finish and doesn’t cost the earth.
Easy DIY Projects: How to Build a Plywood or MDF Workbench
Author Chigwell Building & Joinery
Date 10/02/2017
A simple step-by-step guide to making a great utility unit
If you ask DIYer’s what they need most in their home projects and construction arsenal, many will tell you a simple workbench would make a great addition. A workbench is useful for simple jobs, from clamping and cutting fiddly items to having somewhere to lay strips of timbers or metal for hand-sawing, not to mention the added bonus of some open shelved storage for smaller items. A retail workbench can be quite costly and bulky to store. However, with just one sheet of good quality 18-24mm plywood or MDF, its pretty easy to make a compact workbench that can sit proudly in the corner of your garage or toolshed and not get in the way.
This basic project is the perfect way to solve your cutting headaches if you need a permanent place to attach a steel clamp or simply cut strips of timber. Any novice DIY enthusiast should be able to make this with minimal hassle. So what are you waiting for? Let’s get building!
Materials
Firstly, you'll need a full 2440 x 1220mm (8" x 4") sheet of 18mm-24mm deep plywood or MDF. Either will work however, plywood is the preferred option as it tends to be stronger and will hold together better, not to mention resist moisture for longer, assuming the workbench will be installed somewhere outside in a shed or garage.
You'll also need 6 plastic or stainless steel corner brackets, a box of 1" self-tapping wood screws, a circular saw (or hand saw), a jigsaw, an electric drill and a 2mm wood drill bit.
Cutting List
Firstly, let’s cut out all the pieces you’ll need to make your workbench. Most of the shapes use straight edges, so there’s little in the way of complicated cutting, making this project pretty straightforward!
By following Figure 2 as shown, you will need to cut two pieces for the bench’s sides labelled (A) measuring 812mm long by 368mm wide. To prevent the workbench from rocking on the floor once built, it is recommended that you also cut out circular shapes at one end of each of our two pieces to create feet. The best way to do this is to grab a large round pot of paint and use the pot’s circular shape as a template to draw nice, exact circles with a pencil and then cut them out using a jigsaw. Simple and guaranteed to give you a good finish.
Next, you will want to cut the largest piece labelled (B) which is your bench’s back panel, measuring 1117mm long by 812mm wide. Now cut your (C) piece, which is the bench’s middle horizontal shelf at the same length as the (B) panel, measuring 1117mm long by 368mm wide.
We’re nearly done. All that is left is the penultimate piece to cut which is the workbench top, labelled (D). Cut that at 1270mm long by 432mm deep. And finally, the smallest piece which is the bench’s all-essential centre vertical shelf support to add strength labelled (E), should be cut at 362mm long by 381mm deep.
And that’s all the cutting done!
The Build
Before piecing together, make sure you are working on a firm level surface, otherwise your finished bench may not be square when constructed.
To save hassle later, it is advised to firstly attach your L-brackets to both (A) panels and the centre (E) shelf support. You will need to attached them to the shorter ends of each piece. Simply lay each panel flat on the floor and then whilst holding a bracket in position, mark with a pencil where you want to attach each bracket. 50mm from the edge is a good distance. Then using your drill, drill pilot holes for each bracket and then attach all your brackets to the panels with a screwdriver or electric drill. Now we can start to put the bench together.
Firstly, take panel (C) and measure halfway along the long length and make a mark at 558mm. Do the same along the other edge and then draw a pencil line. The line should be exactly square to both edges. Now measure 100mm in from the line’s edge and mark a visible dot (or X) ready for drilling. Do the same from the other edge, leaving with you two marks and then drill two pilot holes right the way through the panel. This will make it easier for you to attach shelf panel (C) to the support panel (E).
Next grab your support panel (E) and attach the edge (without the L-brackets) to the middle of panel (C) using two wood screws through the pilot holes you just drilled to form a T-shaped piece.
Now take one of your (A) side panels and measure 390mm from the top edge where your L-brackets sit. Do the same along both edges and draw a horizontal pencil line where to two marks meet. Again like the (C) piece, measure 100mm in from either edge of the drawn line, make two pencil X marks and drill two pilot holes into the panel right the way through using your marks. Once done, do exactly the same with the other (A) panel then attach both at either end to the short edge of the (C) panel (now attached to the E panel as a T-shape) using wood screws. You should now have a basic H-frame that may be a little wobbly so be careful when moving the frame.
To make the frame more rigid, let’s now attached the back panel. Carefully lay your constructed frame onto it’s front facing edge so that the back edge is facing upwards. Now lay the back panel labelled (B) in place and manoeuvre it into the correct position, ensuring it fits square and snug. Once in position, attach it to the frame by drilling and attaching wood screws from the edges at both end of your (A) panels. To make the frame extra sturdy, measure halfway along the width of the (B) panel to 558mm and draw a perfectly square pencil line. Use that line as a guide to drill and screw the back panel (B) to the support (E). Once attached, your frame should feel much more solid.
For extra rigidity, you could also drill screws through the back panel (B) into the (C) panel shelf as well. If so, your frame will be super-sturdy!
Finally, your workbench needs a top! So now lay your constructed frame on its back and then place the top panel (D) in place and attach it to the frame by screwing through the L-brackets you attached earlier. That’s it, your workbench is built.
All you have to do now, is turn it to the correct upright position and place it somewhere where you can use it for all your cutting and clamping jobs.
Finishing
If your workbench has any rough edges from cutting, grabs some course sandpaper and give the edges a good rub down. This will remove any sharp corners or splinters which can cut your hands. To make your bench more weather proof, you could either stain it with some good quality wood varnish or paint it with hard wearing exterior wood paint.
Now you have the perfect compact workbench and all it cost was a single sheet or plywood or MDF, some brackets and screws. It’s as easy as that!
Easy DIY Projects: How to Build a Portable Cutoff Bin
Author Chigwell Building & Joinery
Date 18/01/2017
A simple step-by-step guide to making a great storage unit for wood cut offs
Most DIY enthusiasts who regularly make home projects or repairs will start to build a collection of timber cut offs and pieces that they are loathed to part with. Wood is expensive and there’s always a small job that may require just a tiny piece of timber to complete it, so why throw away cut offs when they can be so useful? A pile of loose wood cut offs can start to clutter up a corner of your shed or garage and this becomes a nuisance, not to mention messy. So why not build a simple, portable cut off bin to store them all?
This simple home project is the perfect answer to organising your timber pieces and takes just minimal materials and time to complete. Any novice DIY enthusiast should be able to make this with little difficulty. So let's get started and find out how you can make your own portal timber bin in under one hour!
Materials
Firstly, you'll need a full 2440 x 1220mm (8" x 4") sheet of 18mm deep plywood or MDF. Either is good however, plywood is the better option as it tends to be stronger and will hold together better, not to mention resist moisture for longer, assuming it will be stored outside in your shed or garage)
You'll also need 4 casters (wheels) to make your bin portable, 4 corner L-brackets (or similar), a box of 1" self-tapping wood screws, a circular saw (or hand saw), an electric drill and 2mm wood drill bit.
Cutting List
Firstly, let’s cut out all the pieces you’ll need to make your bin. All of the shapes use straight edges, so there’s no complicated cutting involved, making this project really easy!
By following Figure 2 as shown, you will need to cut three pieces for the bin’s 2 sides and centre panel labelled (D) measuring 794mm long by 394mm wide. To achieve the angles on these panels, measure and mark your cut piece with a pencil at 152mm from the edge along the short side and then mark 375mm from the edge along the long side. Then using a long straight piece of timber or ruler, draw a diagonal line connecting the two marks you have just made. Then with a hand saw (or electric saw) cut along the line to complete your first piece.
Give is a light sanding to remove any rough edges or splinters and then use this piece as a template to mark out and cut two further pieces at exactly the same size. Once done, you should now have three "D" panels.
Next cut 2 pieces measuring 812mm long by 394mm wide, which will be used as both your "A" and "C" panels which have exactly the same dimensions. One will be used as the bin’s front panel whilst the other will be the base panel.
Next, cut your "B" piece, which will be your bin’s back panel at 812mm long by 812mm wide. This piece should be square, with the length and width being exactly the same dimensions.
Finally, cut your two "E" pieces to 590mm long by 378mm wide. These are your bins dividers, giving your bin a total of four compartments to organise various different sizes and types of timbers.
The Build
First off, make sure you are working on a suitable hard flat surface, otherwise your finished piece may not be square when constructed. Once ready, we’ll tackle attaching the three "D" panels to the base panel "C". You may need some assistance from another person to tackle this first stage so grab and extra pair of hands!
The easiest way to attach the panels is to firstly measure exactly halfway along the length of the base panel (C) and draw a pencil line marking the centre. Then along the pencil line, mark two holes at 50mm from either edge and drill two pilot holes right through the base panel.
Now, with the "C" panel sat upright on its edge (being held by your friend), marry it up to one of your "D" panels to create a T-shaped formation and screw your base panel "C" into the edge of the centre divider panel "D" with two 1" wood screws. Now do exactly the same with the remaining two "D" pieces. Drill pilot holes at the ends of the "C" panel and then screw your remaining two "D" side panels to the base, to form a W shape.
Next, carefully turn your constructed frame to the correct upright position and marry up your back panel "B" to your frame so that it touches the rear edges of both the three "E" panels and the base "C" panel. With your helper holding them in place, drill pilot holes along the four touching edges and then screw the back plate to your frame using 1" wood screws through the pilot holes. Once done, your frame should be sturdy and solid and your helper can now go take a break!
We’re close to finishing but firstly, we need to get your divider panels (E) ready. With a tape measure, mark 50mm from the end of the long edge at both ends on just one side of both panels. These marks will tell us approximately how far down our divider panels we want to attach our L-brackets which need to be attached now.
So, once you have your two marks in place on both "E" panels, place an L-bracket up to the edge and mark the two holes with a pencil. Now lightly drill with minimal pressure to make two shallow pilot holes but do not drill all the way through the surface of the sheet. Screw your L-brackets onto your "E" panels at both ends and leave to one side.
Now return to your constructed frame and measure exactly halfway from the back edge of the centre and a side "E" panels touching the back "B" panel and draw vertical lines from top to bottom with a straight edge such as a spirit level. Do this on all the internal sides. These marks will tell us where we wish to place our interior divider "E" panels so that we can align them and screw them in place using our recently attached L-brackets.
As the above suggests, slide your interior "E" dividers inside the constructed frame, then firstly screw them to the centre "D" panel with the L-rackets. Once in place, then hold them square to the outer "D" panels using your pencil marks nice and steady. Then screw the outer "D" panels to the interior divider "E" panels by drilling pilot holes and 1" wood screws.
By now, your timber bin is really starting to take shape and there’s just a couple of stages to go and that is to attach the front "A" panel. Simply lay your constructed frame on its back, place the "A" panel onto top of the front opening, drill pilot holes along the bottom edge, the two side edges and the centre line and attach with 1" wood screws.
Your bin frame in now constructed! All that’s left to do to make it portable is to attach the casters. Simply lay the bin on its back, hold each caster up to the corner edges of the base, mark the holes with a pencil, drill pilot holes appropriately and then screw to the base with your 1" wood screws.
That’s it, you’re done! Return your timber bin to its upright position and admire your handy work.
Finishing
If you want to give your timber bin the finishing touch, give it a light sand with a thin coarse sandpaper along the cut edges to remove any splinters and then you can either stain it with some good quality wood varnish or paint it with hard wearing exterior wood paint.
Now you have a suitable place to store all those timber cut offs that were cluttering up your tool shed. Happy organising!
Easy DIY Projects: How to Build a Plywood Sawhorse
Author Chigwell Building & Joinery
Date 20/12/2016
A simple step-by-step guide to making an adjustable, multifunctional sawhorse
If you're regularly involved in DIY projects, no doubt you've had many scenarios where a sawhorse would have saved you a lot of time and effort. Yet many retail sawhorses can be expensive, impractical and bulky. So what’s the answer?
We have the ideal home project that involves the simple construction of a multi-functional sawhorse using just a single sheet of 8” x 4” 18mm plywood that will do more than just a single job. This design will give you a strong frame to use for cutting long lengths of timber, large sheets of plywood or MDF and act as a sturdy scaffold platform that will take your weight for hard-to-reach jobs indoors. So let's get started and find out how you can make your own lightweight plywood sawhorse in no time!
Materials
Firstly, you'll need a full 2440 x 1220mm (8” x 4”) sheet of 18mm deep plywood. Unfortunately, MDF is not recommended as it is not strong enough for this particular project.
You'll also need boxes of 1” and 1.25” self-tapping wood screws, a jigsaw (or circular saw), an electric screwdriver (or regular screwdriver) and some good quality wood glue.
Cutting List
Your first task is to cut to shape and size all the components of the main support frames of the horse. Firstly, you'll need to cut a total of 4 side panels labelled (A) on the Figure 2. Each of these panels need to be the exact same size at 762mm tall by 406mm wide at the base and 101.5mm at the top centre point. By cutting them to this size, you should be able to get four from your single sheet of plywood, simply by cutting them alternately with two upright and two upside down, laying side-to-side.
Don't forget cut out a semi-circular shape at the base of each side panel. This will create “feet”, preventing the horse from rocking on uneven surfaces. The cutout doesn't have to be accurate but it's essential to have this to avoid an unstable sawhorse when in use.
Next we move onto the sawhorse worktop. Cut 2 lengths of plywood at 1651mm long by 400mm wide. These will form the table top of the sawhorse and be attached together later on to create a strong, weight bearing surface.
Now we need to cut out the support joists for the sawhorse frames. From the plywood you have left, you should be able to cut out 12 lengths of plywood measuring 406mm long by 102mm wide.
And finally, cut yourself two pieces of plywood at 400mm long by 25mm wide, which we'll attach the your final sawhorse worktop near the end of the build which will act as cleats to hold the top in place, when in use.
The Build
Firstly, create a set of 6 double-lined joists by attaching two together each with wood glue, labelled (C) on Figure 2 and as illustrated on Figure 3. Clamping them together whilst they dry will ensure they set accurately with no movement.
Once your double-lined joists have set, attach them along the centre vertical line of your side panels as marked in Figure 3, 51mm from the top of the side panel and then spaced top edge to top edge 228mm apart vertically. Use your 1.25” wood screws to attach the joist at either end to create your two horse bases, as shown in Figure 3. Once done you should have two sturdy based.
To create the worktop, you can take one of two directions. You can either simple attach the two sheets marked (D) in Figure 2 using a combination of wood glue and 1” screws to make a simple 36mm thick plywood base which will be sufficiently strong enough for basic jobs.
If however, you intend to use the sawhorse for other tasks such as a step scaffold that needs to bear significant weight, you will need to build an integrated subframe to add strength and rigidity to the sawhorse worktop. By following Figure 4, you can build a basic frame from leftover plywood or ideally from a few lengths of rough sawn kiln dried timber lengths at 19mm wide by 38mm in depth.
The subframe is fairly easy to build by cutting two strips to exactly the same length as your worktop at 1651mm and then adding 5 side joists incrementally 406mm apart, cut to 324mm in length. Attach the subframe simply by using 1” screws through the plywood worktop surface and additionally through the base sheet.
By adding the subframe, you significantly increase the overall strength of the worktop and reduce the possibility of bending, warping or even breaking under extreme pressure. If you have the materials at hand to do this, we highly recommend you follow this part of the instructions.
Finally, once your worktop is constructed, attach the two remaining cleats marked (B) on Figure 2 approximately 150mm from either edge. These will act as stops so that your sawhorse remains in place whilst in use.
Now you are ready to assemble and use your sawhorse for various cutting tasks and use any one of the three different set heights of the support joists as your scaffold platforms depending on the requirements of the job.
Finishing
If you want to give your sawhorse the finishing touch, give it a light sand with a thin coarse sandpaper, especially along the cut lines to remove any sharp edges or splinters and then you can either stain it with some good quality wood varnish or paint it with hard wearing exterior wood paint.

