Easy DIY Projects: How to Build a Plywood or MDF Workbench
Author Chigwell Building & Joinery
Date 10/02/17
A simple step-by-step guide to making a great utility unit
If you ask DIYer’s what they need most in their home projects and construction arsenal, many will tell you a simple workbench would make a great addition. A workbench is useful for simple jobs, from clamping and cutting fiddly items to having somewhere to lay strips of timbers or metal for hand-sawing, not to mention the added bonus of some open shelved storage for smaller items. A retail workbench can be quite costly and bulky to store. However, with just one sheet of good quality 18-24mm plywood or MDF, its pretty easy to make a compact workbench that can sit proudly in the corner of your garage or toolshed and not get in the way.
This basic project is the perfect way to solve your cutting headaches if you need a permanent place to attach a steel clamp or simply cut strips of timber. Any novice DIY enthusiast should be able to make this with minimal hassle. So what are you waiting for? Let’s get building!
Materials
Firstly, you'll need a full 2440 x 1220mm (8" x 4") sheet of 18mm-24mm deep plywood or MDF. Either will work however, plywood is the preferred option as it tends to be stronger and will hold together better, not to mention resist moisture for longer, assuming the workbench will be installed somewhere outside in a shed or garage.
You'll also need 6 plastic or stainless steel corner brackets, a box of 1" self-tapping wood screws, a circular saw (or hand saw), a jigsaw, an electric drill and a 2mm wood drill bit.
Cutting List
Firstly, let’s cut out all the pieces you’ll need to make your workbench. Most of the shapes use straight edges, so there’s little in the way of complicated cutting, making this project pretty straightforward!
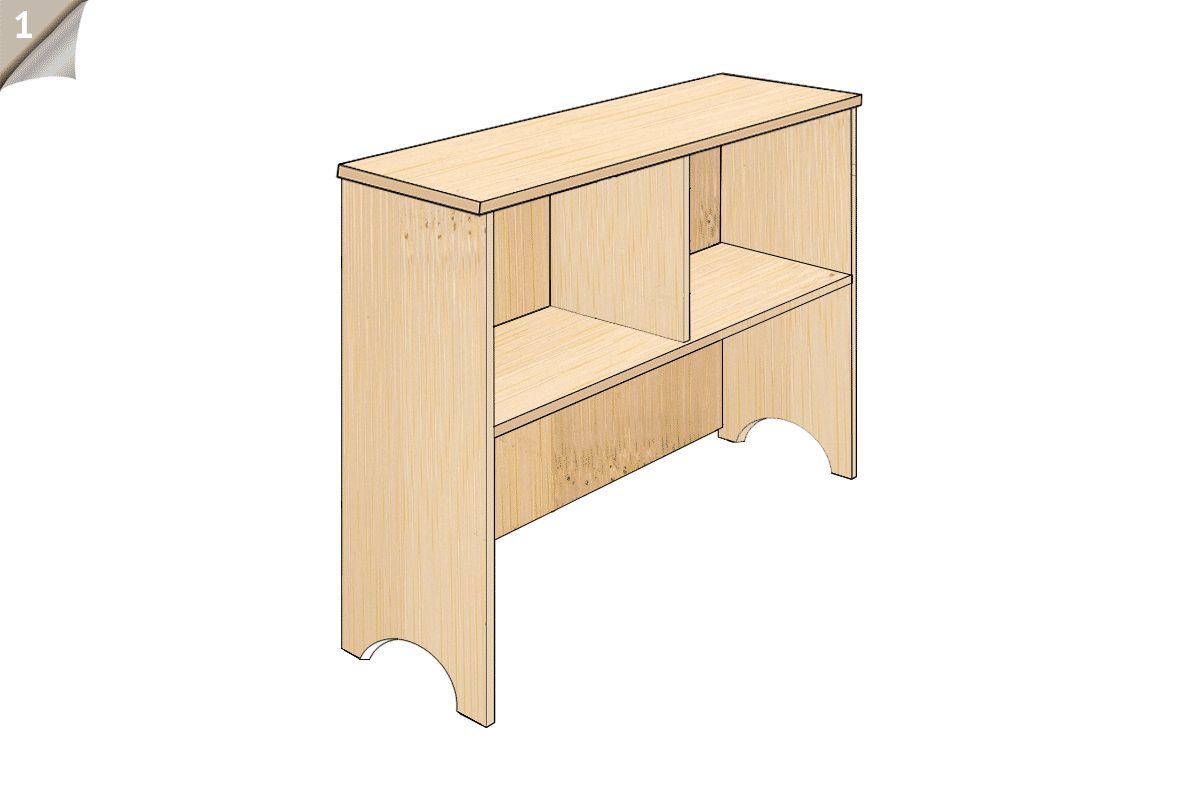
By following Figure 2 as shown, you will need to cut two pieces for the bench’s sides labelled (A) measuring 812mm long by 368mm wide. To prevent the workbench from rocking on the floor once built, it is recommended that you also cut out circular shapes at one end of each of our two pieces to create feet. The best way to do this is to grab a large round pot of paint and use the pot’s circular shape as a template to draw nice, exact circles with a pencil and then cut them out using a jigsaw. Simple and guaranteed to give you a good finish.
Next, you will want to cut the largest piece labelled (B) which is your bench’s back panel, measuring 1117mm long by 812mm wide. Now cut your (C) piece, which is the bench’s middle horizontal shelf at the same length as the (B) panel, measuring 1117mm long by 368mm wide.
We’re nearly done. All that is left is the penultimate piece to cut which is the workbench top, labelled (D). Cut that at 1270mm long by 432mm deep. And finally, the smallest piece which is the bench’s all-essential centre vertical shelf support to add strength labelled (E), should be cut at 362mm long by 381mm deep.
And that’s all the cutting done!
The Build
Before piecing together, make sure you are working on a firm level surface, otherwise your finished bench may not be square when constructed.
To save hassle later, it is advised to firstly attach your L-brackets to both (A) panels and the centre (E) shelf support. You will need to attached them to the shorter ends of each piece. Simply lay each panel flat on the floor and then whilst holding a bracket in position, mark with a pencil where you want to attach each bracket. 50mm from the edge is a good distance. Then using your drill, drill pilot holes for each bracket and then attach all your brackets to the panels with a screwdriver or electric drill. Now we can start to put the bench together.
Firstly, take panel (C) and measure halfway along the long length and make a mark at 558mm. Do the same along the other edge and then draw a pencil line. The line should be exactly square to both edges. Now measure 100mm in from the line’s edge and mark a visible dot (or X) ready for drilling. Do the same from the other edge, leaving with you two marks and then drill two pilot holes right the way through the panel. This will make it easier for you to attach shelf panel (C) to the support panel (E).
Next grab your support panel (E) and attach the edge (without the L-brackets) to the middle of panel (C) using two wood screws through the pilot holes you just drilled to form a T-shaped piece.
Now take one of your (A) side panels and measure 390mm from the top edge where your L-brackets sit. Do the same along both edges and draw a horizontal pencil line where to two marks meet. Again like the (C) piece, measure 100mm in from either edge of the drawn line, make two pencil X marks and drill two pilot holes into the panel right the way through using your marks. Once done, do exactly the same with the other (A) panel then attach both at either end to the short edge of the (C) panel (now attached to the E panel as a T-shape) using wood screws. You should now have a basic H-frame that may be a little wobbly so be careful when moving the frame.
To make the frame more rigid, let’s now attached the back panel. Carefully lay your constructed frame onto it’s front facing edge so that the back edge is facing upwards. Now lay the back panel labelled (B) in place and manoeuvre it into the correct position, ensuring it fits square and snug. Once in position, attach it to the frame by drilling and attaching wood screws from the edges at both end of your (A) panels. To make the frame extra sturdy, measure halfway along the width of the (B) panel to 558mm and draw a perfectly square pencil line. Use that line as a guide to drill and screw the back panel (B) to the support (E). Once attached, your frame should feel much more solid.
For extra rigidity, you could also drill screws through the back panel (B) into the (C) panel shelf as well. If so, your frame will be super-sturdy!
Finally, your workbench needs a top! So now lay your constructed frame on its back and then place the top panel (D) in place and attach it to the frame by screwing through the L-brackets you attached earlier. That’s it, your workbench is built.
All you have to do now, is turn it to the correct upright position and place it somewhere where you can use it for all your cutting and clamping jobs.
Finishing
If your workbench has any rough edges from cutting, grabs some course sandpaper and give the edges a good rub down. This will remove any sharp corners or splinters which can cut your hands. To make your bench more weather proof, you could either stain it with some good quality wood varnish or paint it with hard wearing exterior wood paint.
Now you have the perfect compact workbench and all it cost was a single sheet or plywood or MDF, some brackets and screws. It’s as easy as that!

