News
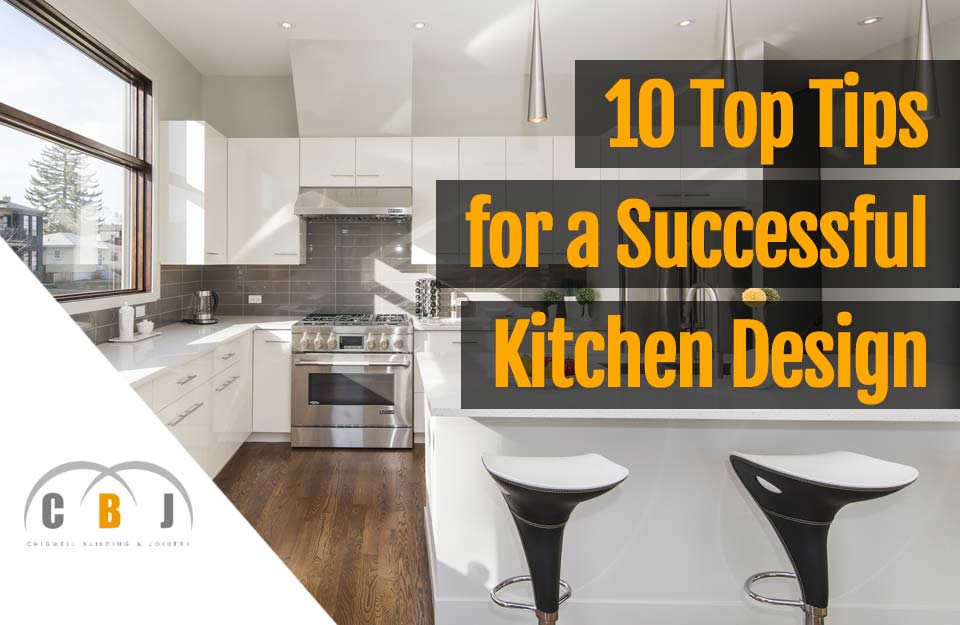
10 Top Tips for a Successful Kitchen Design
Author Chigwell Building & Joinery
Date 11/06/2019
The kitchen is literally the hub of the home.
Therefore when you start to think of designing your new kitchen, you need to ensure you're going to make the right choices and decisions long term.
No one wants to be changing their kitchen every few years.
If you come to think of it, you and your family will be spending thousands of hours in the kitchen until you remodel or change it sometime in the future.
So it is imperative to choose well in terms of aesthetics as well as functionality.
Read on to discover our Top 10 Tips for a Successful Kitchen Design or jump to a chapter using the links listed below:
Chapters
- Proper Planning
- Efficient Layout
- The Kitchen Triangle
- Appliances & Power Sources
- Kitchen Cupboards & Storage
- Countertops
- Flooring
- Lighting
- Air
- Refuse
1. Proper Planning
The importance of planning ahead is crucial.
You cannot just go and pick the first kitchen that you like and have it installed.
You need to think through key aspects, such as the space available, your needs as a family, and practicality considerations.
A U-shaped kitchen might be the most common option as it offers various advantages, but it may not be the best choice for your room.
An L-shaped kitchen or a linear design might actually prove to be better in some cases.
You should make a list of the most important aspects and factors to consider so as to discuss them with the interior designer or kitchen manufacturer.
2. Efficient Layout
Your kitchen is where the family gathers for meals, but it is also where most family members meet up at other times of the day too.
You thus need to make sure that the kitchen design is kid-friendly, accessible and practical.
Wide walkways are recommended, especially near the cooking zone.
Ideally the cooktop should not be near high traffic areas as this could help in avoiding spills as well as increase safety since there is less chance for a handle to be caught or tipped.
The fridge on the other hand should not well accessible to all, including any passers-by.

3. The Kitchen Triangle
This is an extremely important aspect of kitchen design.
You will need to make sure that there is minimal space between the fridge, the sink and the cooker.
You cannot afford to move around from one to the other while they are located too far away from each other.
They should be placed in close proximity and in the layout of a triangle for maximum efficiency and practicality.
4. Appliances & Power Sources
When planning a kitchen you will need to devote some time thinking about the appliances which you plan to have, and where you will be placing them.
These decisions will allow you to plan the locations where you will need to have power sources to plug them in.
This includes gas and/or electricity lines.
As a general rule of thumb it is best to install multiple outlets along the kitchen backsplash.
Another useful tip with regards to kitchen appliances is to avoid placing appliances in corners as this could prove problematic for accessibility and practicality.
5. Kitchen Cupboards & Storage
Cabinets should be allowed enough door clearance. This also applies to appliance doors.
While corner cupboards may seem to be very spacious, generally they are not that practical as they are too deep and lack ease of accessibility.
Even if you have plenty of storage space you may end up in situations when you still do not have room to store everything.
From utensils and cookware, to kitchen supplies and dinnerware, you shall be storing a lot of items in your kitchen.
So you need to make it a point to plan your kitchen well so as to have plenty of space available.
- Overhead cabinets going right up to the ceiling could offer a welcome storage space for those kitchens where floor space is somewhat limited.
- Adding some shelves to combine storage and décor is another good idea. Here you can place certain key utensils, as well as spices, oils, and pots and pans which you tend to use often.
- At times drawers work out to be better than cupboards for certain items.
- While storage space is important, you need to make sure that there is enough space for all of the appliances, including small ones, which you might wish to have in your kitchen. These would otherwise end up cluttering the countertops and reducing space for other tasks.
6. Countertops
The surface area of the kitchen will be used as your worktop to prepare food, serve and do everything else!
Regardless of the amount of countertop space you will have, there may be times when it will not suffice.
Examples being when you have guests for dinner, or maybe when you have a party and there are more dishes and stuff lying here and there than there usually are.
You may thus wish to add more counter space by adding a kitchen island, if there is enough floor space.
Another important tip is to make sure that there are proper countertop spaces next to the cooktop, the microwave, and the fridge.
This is generally referred to as landing space that is the area where you will be placing items when using these appliances.
While discussing your kitchen countertops it also needs mentioning that the material you will be choosing is also important.
Make sure that the surface area is not only about aesthetics, but practicality.
Choose a material that is easy to care for and maintain.
Matte finishes do not look as dirty as glossy ones.
Also, avoid grouting or any material that could scratch easily.
7. Flooring
Slip resistant and easy to clean flooring options are recommended.
Remember that kitchens are prone to spills and stains.
So you need to choose wisely when you choose your kitchen flooring.
8. Lighting
The kitchen is a room that needs to be appropriately lit.
You should consider the most energy efficient type of lighting, as well as its positioning.
For instance, you do not want to have the lights placed in a way that they end up casting a shadow on your worktop rather than illuminating it properly.
Under cabinet lights are generally recommended.
9. Air
Bear in mind that your kitchen is a place where there is going to be a lot of moisture as well as odours.
You need to ensure that there is proper ventilation.
Should this be somewhat limited in terms of apertures make sure to invest in a good range hood.
10. Refuse
Easily overlooked, you need to allow space for trash disposal and recycling in your kitchen.
This is the place where most waste is generated.
Built-in bins may be the best option if it is possible to incorporate them.
Otherwise do make sure that there is enough space for garbage containers or bins.

How to Make an Upholstered Headboard using MDF
Author Chigwell Building & Joinery
Date 08/05/2019
An upholstered headboard is simply ideal if you want a more aesthetically pleasing bed, which is also more comfortable and useable.
If you like sitting up in bed to read at night, you'd much rather have an upholstered headboard to lean against, instead of a hard frame or a bare wall.
If your bed does not have such a headboard, you can make one yourself quite easily.
In this article, we're going to explain how easy it is to make your own upholstered headboard with just a few materials and basic tools.
Read on to find out more or use the links below to jump to the chapter that interests you:
Chapters
- Materials Required
- Tools Required
- Cutting the Headboard Shape
- Cutting the Padded Foam
- Adding Upholstery
- Attaching Buttons
- Wall Mounting
- Finishing Up
1. Materials Required
In order to make a headboard, the most practical option is to use a sheet of plywood or MDF.
It is recommended that the thickness of the MDF or plywood sheet is at least 12.5mm (half an inch).
Either material is sturdy enough for the job, but not too thick to make cutting or shaping too troublesome.
Naturally, the width and height of the headboard will depend on the size of your bed.
A good quality foam will be needed, and it is important to have enough to cover all the surface are of the headboard with some wastage.
Padded foam that is 50mm (2 inches) thick is the best option.
This type of foam generally comes in sheets that are 600mm (24 inches) wide, so you'd typically need two sheets to cover an entire headboard.
Next, suitable fabric plus two or three layers of quilt batting will be needed to cover the headboard, as well as have some overlaps on each side so as to wrap it comfortably to the back of the panel.
When it comes to the fabric you use, make sure it's a material that's not susceptible to creasing.
It's always best to iron it well before attaching it to the headboard.
Many people like to use buttons to decorate an upholstered headboard to give it a classic finish.
In this instance, prong buttons are ideal.
2. Tools Required
There is no need to have a lot of tools to complete this project, so even a basic DIYer should be able to do a good job of making a headboard.
The most important tools and equipment to have available are:
- a jigsaw to cut more easily and effortlessly
- a sharpie or a marking instrument
- a large ruler or a yardstick
- drapery cord
- buttons (optional)
- wood glue
- adhesive spray
- a staple gun and staples
- a flexible ruler or a template (to outline the headboard shape)
- cleat hanger
- screws
- electric drill
Also, if the headboard is going to be mounted to the wall wall, cleats will be required.
3. Cutting the Headboard Shape
If the shape of the headboard is going to be rectangular, then all that's required is a pencil and a long ruler to draw a guiding line around the MDF sheet.
To ensure your lines are exactly 90º to the board, use a square to mark your edge lines.
Then with the jigsaw fitted with a fine toothed blade, it's fairly easy to cut along the marked line to create the final headboard shape.
If you have a more elaborate design in mind, it's best to prepare this on a template first using some firm cardboard or a sheet of hardboard.
This will make it much easier to create the shape and cut more precisely.
If you want to create an arch style headboard for example, it's best to use a compass to accurately draw the top circular edge.
Then trace the templated shape onto the board with a pencil and cut as necessary.
4. Cutting the Padded Foam
The next step is to cut the padded foam.
Roll out the foam onto a clean floor or a solid flat worktop, and then place the cut-out headboard on top of it.
Trace along the edges of the template using your marker pen or sharpie so that you have an exact shape drawn out.
Once you have a completed shape marked out, start cutting the foam along the line.
Once the foam shape it cut, spray adhesive onto both one surface of the foam and onto one surface of the solid MDF or plywood headboard sheet.
Then carefully stick and press down the foam directly onto the headboard sheet, making sure all edges line up accurately and neatly.

5. Adding Upholstery
The next step is to add the quilted batting layers over the foam.
Cover the foam side up with a couple of layers of stretched quilt batting, making sure to smooth out any wrinkles as you go.
If any persistent wrinkles appear, trying steaming them out with a steamer or an iron but do not let the iron touch the surface or burn the material.
Once in place using the staple gun, attach to the headboard along the edge at the back with staples, all the time making sure that it is pulled taut as much as possible.
After you've completed stapling the quilt batting, it's time to attach the finishing fabric.
The process is pretty much the same as attaching the quilted batting.
Simply cover up the headboards front facing panel with your fabric, and then flip it over to allow you to staple the fabric securely to the back.
If possible, have someone help out at this stage of the upholstering process.
Where there's areas where the quilting or fabric needs pulling tight, the staples can be removed quite easily and reset, although it's best to avoid this and hold everything firmly in the first place.
It will also ensure you end up with a neater finish.
6. Attaching Buttons
A popular design with headboards is to incorporate buttons for that classic, elegant look.
It's best to mark the headboard where the buttons are going to be attached to make sure they are positioned accurately and most importantly, spaced apart equally.
For best results, use a drill with a small sized drill bit to make the pilot holes.
Try to make the drill hole depths as consistent as possible.
Drilling may cause some foam to be left. This can easily be plucked out before continuing.
Then finally, the buttons can be attached tightly with drapery cord to the back or alternatively, attached with a strong glue.
7. Wall Mounting
There's various ways to mount a headboard, but with a cleat hanger things are a lot easier.
Simply attach one part to the wall and the other to the headboard.
If your walls are solid concrete, use suitable wall anchors and if your wall is a stud wall, locate the studs and attach using wood screws.
Then attach the other part of the cleat hanger to a suitable place at the back of the headboard, ensuring it will sit at the right height.
Screw the hanger to the back of the headboard using suitable wood screws and then hang your headboard into place!
8. Finishing Up
After you've mounted the headboard to the wall, sit back and marcel at your newly elegant bed arrangement.
And of course, try it out and make sure it's comfortable to lean against and practical to use.
You will be amazed at the huge difference a DIY upholstered headboard will make to a bedroom.
It's a relatively simple and cheap project to complete, and it's not going to take too long either.
The best news is, if you were to check how much it would cost to purchase an upholstered headboard and compare it with what you end up spending to make one yourself, the difference is huge.
So why not give it a go?
Order some plywood or MDF sheets, and make your own stunningly beautiful padded headboard.

What is a Wall Bed and Why Get One?
Author Chigwell Building & Joinery
Date 09/04/2019
What is a Wall Bed or Murphy Bed?
A Murphy bed, also known as a wall bed or pull down bed is a practical sleeping option for bedrooms.
One end of the bed is hinged so as to enable it to prop up vertically either against the wall, or into a closet space.
This kind of bed was named after William Lawrence Murphy, who patented this kind of bed in the early 1900's.
Murphy beds are still very popular nowadays, especially since many properties are particularly small in this day and age.
Thus Murphy beds are ideal when it comes to freeing up space, and making the most of the floor space.
Wall beds will have the mattress attached to the frame of the bed to ensure that it is held in place even when the bed is pushed up vertically.
Nowadays wall beds are far easier to push up thanks to torsion springs or piston lifts that take the bulk of the weight.
Find out more about uses, advantages and disadvantages of wall beds and Murphy beds below in the following chapters.

Chapters
- Why Install a Wall Bed?
- Advantages
- Disadvantages
- Horizontal Single Wall Bed
- Horizontal Single Shelf Down Wall Bed
- Horizontal Single Shelf Up Wall Bed
- Vertical Double Sofa Wall Bed
- Study Single or Double Wall Bed
- Bunk Beds
- Conclusions
Why Install a Wall Bed?
When it comes to choosing the type of bed you will have in your bedroom, it is important to take into account space considerations.
In most bedrooms the bed takes up most of the floor space, leaving little room for other furniture and to move around.
That is why in such cases it is highly recommended to consider opting for a Murphy bed. Murphy beds are widely used in studio apartments and flats.
When the bed is not in use, it can be pushed up against the wall freeing up floor space to be used during the day.
These beds are also ideal in children’s’ rooms as during the day the floor space which would otherwise have been occupied by the bed, can be used for playtime.
Advantages
Some of the main advantages of Murphy beds include:
- Murphy beds are very practical, thanks to the fact they can pull up against the wall, leaving the floor space for other uses when not folded down.
- ideal for cases where space saving is a must.
- some Murphy beds serve a dual purpose nowadays. This is because some styles include other furniture, such as shelving, drawers or a table.
- the bed can be tucked away into a closet too.
- the mattress is attached and so it is safe.
- there’s no box springs.
Disadvantages
Some drawbacks of Murphy beds include:
Common Wall Bed Styles
Horizontal Single Wall Bed
One of the most popular styles of wall beds is the Horizontal Single.
This type of bed, takes up little floor space and it folds up horizontally. Thanks to a side piston lift system the bed can be opened easily and effortlessly.
Horizontal Single Shelf Down Wall Bed
In this style the bed will also fold horizontally, but beneath it there is a desk.
So when the bed is in use the desk will basically become a shelf that slides down, since it will be on the upper side of the bed base.
A very practical bed, which serves dual purposes and is perfect for teenagers’ bedrooms and study rooms.
Horizontal Single Shelf Up Wall Bed
In this case the wall bed will fold horizontally, but the shelf on its base will protrude upwards.
A very practical design ideal for study rooms, which also looks very stylish.
Vertical Double Sofa Wall Bed
This is a very popular design for wall beds.
The vertical double sofa wall bed is installed in bedrooms as well as living rooms, because the bed converts into a sofa during the day.
Since this is a double bed, the sofa is of a decent size generally because it is a comfortable two-seater.
This bed solves the problem for households where one cannot afford to place a sofa permanently due to limited floor space.
Study Single or Double Wall Bed
This bed converts into a worktop or desk during the day when the bed is not required.
A very convenient solution for small bedrooms and study areas, this style can be either with a single or a double bed.
Needless to say, the bigger the bed, the more spacious the desk can be.
Bunk Beds
Bunk beds are very popular in kids’ rooms, so this style is convenient and practical since the two bedding system will often be integrated with a wardrobe or shelving system.
The beds can be folded up when not in use and so during the day the floor space can be put to good use, such as for playtime.
Conclusions
Even though Murphy beds were invented over a century ago, they have evolved into modern, contemporary furniture pieces as many manufacturers revamp and rethink the whole concept of wall beds by incorporating the bed with modular cabinets.
Nowadays you can find wall bed systems in different styles, materials and colours.
Many can be custom made according to your specific room measurements or preferences.
Common options include having a sofa, shelving system or desk to use when the bed itself is pushed up against the wall or into a dedicated cabinet space.
Murphy beds or wall beds are widely used and their popularity will not fail because they are extremely practical and convenient.
With practical furnishings becoming increasingly popular due to home becoming smaller, wall beds make for one of the best space-saving options around.
Many apartments have small rooms, with very limited floor space.
But thanks to a wall bed, you can free up otherwise disused space and make your home more adaptable and practical to your needs.
Whether the wall bed is temporary for guests to stay on or to make your rooms feel bigger and more useable, a wall bed is a great space saving solution.
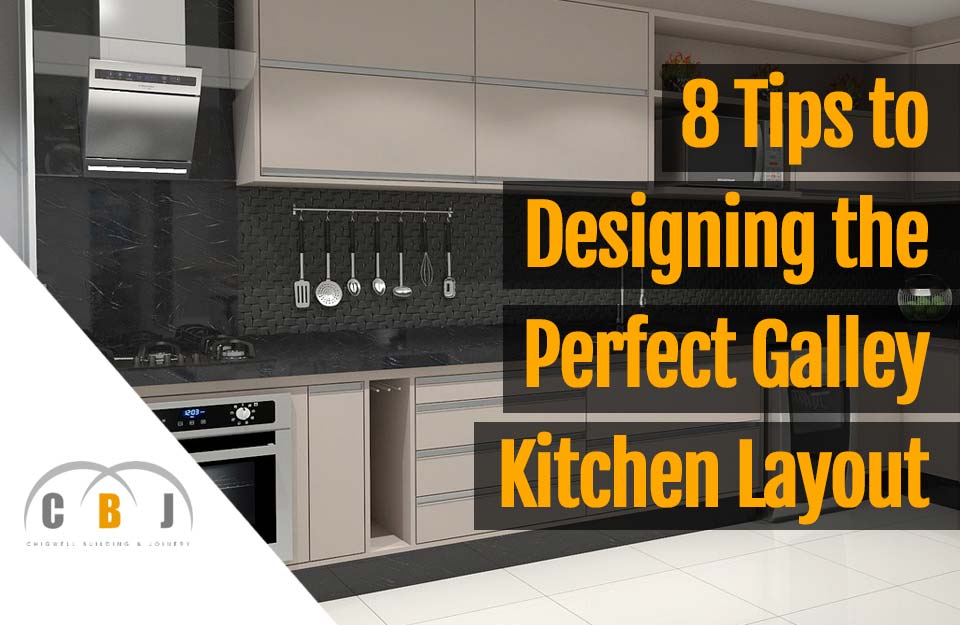
8 Tips to Designing the Perfect Galley Kitchen Layout
Author Chigwell Building & Joinery
Date 07/03/2019
If your kitchen area is narrow or limited for space, sometimes the design and layout choices you have are extremely limited.
Long narrow kitchens are a prime example and in this instance, a galley wall kitchen is most likely the one and only solution.
You may feel as though this limits your ability to be creative and integrate a number of features that a larger room allows. But with some ingenuity and creative thinking, a galley kitchen can in fact be a great success.
If you're yet to design your galley kitchen, this article explores 8 key considerations to making it work perfectly, whether you're a budding chef, a parent with a growing family or someone that likes to entertain friends and family.
Find out more about galley kitchen layouts below in the following chapters
Contents
- Maximising Space
- Single Wall vs Facing Walls
- Positioning Appliances
- Choosing Suitable Cabinets
- Tall Cabinets & Storage
- Appropriate Lighting
- Door Styles & Colours
- Eating & Socialising
- Conclusions
1. Maximising Space
The very first and integral part of designing the perfect galley kitchen is to maximise your available space.
You should favour using tall units, wall units and shelving to capitalise on the space you have.
Use as much ceiling height as you can, as this is less likely to impact on the usable floor area and give you that all important storage every kitchen needs.
Stacking integrated appliances such as ovens and microwaves on top of one another is a great space saver too.
Coupled with the use of pale colours and minimalist cabinets styles, you can create a more spacious look, and remove the corridor feel galley kitchens invariably have.
Make sure you have ample lighting too, whether natural or artificial.
This is essential to help enhance the kitchen layout and soften the look, giving a greater sense of openness.
2. Single Wall vs Facing Walls
If you only have a single wall to work with, you will really have to think wisely about placement of cabinet, appliances and preparations areas.
It may seem like the impossible, but there are numerous examples of single wall kitchens that look stunning and really work.
In this situation, try to place bulky items at the extreme ends of each wall.
The refrigerator can be tucked away at one end whilst the oven and microwave can be placed at the other.
This approach ten leave the maximum amount of worktop space available to create a suitable preparation area, and to integrate a sink and drying area.
If however, you have the option to build your kitchen on two opposing walls, you thankfully have a little more flexibility to play with.
One wall can be designed as the cooking area whilst the other can be the cleaning and prepping area.
The key is to make your kitchen easy to move around, whilst being practical and useable.
Try to visualise how you'd like to use the room and the placement of appliances, cabinets, sinks and refrigerators will become more obvious to you.
3. Positioning Appliances
When choosing your appliance positions, a smart tip is to avoid placing them close to windows or even worse, in front of them!
Appliances are bulky, so they'll easily block a ton of natural light. This will make the room feel gloomy and small.
Another tip is to install your oven near or next to the sink on the exact same wall as each other.
Ensure that your refrigerator and high hanging wall cupboards are parallel to each other for easier manoeuvrability. Leave at least a meter between the sink and the oven.
Having the fridge within reach of the oven and sink is ideal to maximise space and the food preparation triangle.
4. Choosing Suitable Cabinets
The type of cabinets you choose will make your kitchen more visually appealing.
Many people are now choosing contemporary style slab cabinets that typically have inset handles.
These types of doors help to give the kitchen a sleeker look and of course, limit snagging handles on clothing as you walk past them.
Many cabinets come in a smooth gloss finish which helps to bounce light around the room, as well as give a cohesive finish that spreads across the length of the room.
Cabinets without handles will make the room feel longer and larger, whilst handles can become a nuisance if you brush into them when moving from cabinet to cabinet.
Cabinets with handles are now considered a little old fashioned. So if you want your kitchen to be modern and sleek, handleless is the way to go.

5. Tall Cabinets & Storage
As previously mentioned, tall cabinets are a great storage problem solver and can help use maxim space where no space seems available.
It's important to place cupboards and cabinets in a galley kitchen carefully to ensure you minimise overcrowding.
Too much will make the room feel cramped, but a few well placed full height cabinets with make the room feel taller and useable.
Every kitchen no matter the size needs to feel roomy enough to move around, whilst offering all the practicalities you'd expect.
Cabinets that feature pullouts, pull downs and clever integrated storage will maximise every inch of space you have, without feeling you have to cram as much in as possible.
6. Appropriate Lighting
In a room that feels small, light is your best weapon to making it feel spacious.
Make sure you allow as much natural light to flood the room as possible. So never block windows or place tall units or appliances adjacent to window openings.
As far as integrated lighting is concerned, install lights wherever possible.
As well as ceiling lights, experiment with integrated lights such as plinth floor lights, down lights onto counters and even shelf lights.
These look especially good during darker days or nighttime, where you can really illuminate the best features of your new kitchen and enhance the look to create a stunning visual experience.
7. Door Styles & Colours
In a galley kitchen, you'll want to choose a design and colour scheme that emphasises or creates the illusion of space.
Light and neutral colours are more suitable as they tend to bounce light around. Dark colours tends to make rooms feel smaller.
Not only will your cabinets choices affect lighting, but your countertops will too.
Granite and quartz surfaces are highly polished and again, will bounce light around the room.
Cheaper laminates and butchers blocks may be a more economical option, but they seldom help to make a room feel more spacious.
8. Eating & Socialising
Whether you regularly entertain or like to spend time in the kitchen enjoying breakfast or a light snack with the family, getting this aspect right is critical in a narrow kitchen.
On a single walled galley kitchen, its hard to find areas to sit and relax but there are clever ways to achieve this.
You could install a small narrow bench seating area along an adjacent wall or even integrate a folder table that is only used temporarily.
If the room allows, you may even be able to integrate a small section of countertop that hangs over one edge or at 90 degrees to the main work area.
By doing so, you can use a couple of stools and have a cosy seating area to enjoy drinks and small bites.
With a little imagination, there are ways to achieve all the must have's with a little compromise here and there.
Conclusions
It's fair to say that a galley kitchen is a difficult space to redesign.
With so few layout options as your disposal, it does seem like there's little that can be achieved that hasn't already been done before.
But don't despair. Modern kitchen units offer so much more storage and a style options that they do free up space that older units were incapable of.
Sometimes it's not just about the actual space available, but how you use it.
With some small adjustments and clever placement of the essentials, you can still create a stunning galley kitchen that ticks all the right boxes.
But following just some of the suggestion above, you should be able to create a galley kitchen that does all you need and more.

7 Tips to Designing the Perfect Single-Walled Kitchen Layout
Author Chigwell Building & Joinery
Date 07/02/2019
If you're planning a single walled kitchen layout and think your design options are limited, then think again.
In this article, we explore various ways to make a single walled kitchen work and look amazing!
Ultimately, a kitchen spread over just one wall can actually turn out to be more practical and affordable than you think.
Getting Started
Planning the perfect single walled kitchen requires a lot of care and attention, as space tends to be limited. In fact this type of kitchen layout is generally used when one has a very small or compact kitchen.
There's various things to take into account, including the space available, the room layout and which one is the most practical wall.
So, let's take a look at some very simple tips and tricks anyone can follow, which will help you design the perfect single-walled kitchen, and still manage to achieve a stylish finish with the feeling of space and functionality.

1. Add a Kitchen Island
When restricted to a single wall, you can easily add more counter space by installing a kitchen island.
Obviously, make sure you have enough floor space to achieve this.
Assuming there is, a kitchen island is the perfect complement to a single-walled kitchen.
A kitchen island sits parallel to the kitchen wall and helps to enhance the overall layout, creating extra counter space and storage space.
If floor space is limited, you can opt for a narrower island, which is still very practical.
If a fixed island is a non-starter, there's also the option of a portable island, which can serve as a breakfast table, bar, or cooking area.
Both add more practicality and counter space and look amazing.
The kitchen island can also enable you to establish the working triangle in your kitchen. While the sink and refrigerator can be placed along the kitchen wall, you can have the oven and cooktop installed within the kitchen island.
2. Buy Suitable Appliances
Choice of appliances is another important consideration.
The appliances will need to be located along the same wall, with the refrigerator possibly being positioned as a standalone unit on a separate wall.
Make sure you choose appliances that are suitable and complement the scale of your kitchen.
Shop for compact ovens, microwaves, dishwashers and warming drawers, and keep in mind the need for models which are less noisy.
The colour of the appliances should complement the colour of your kitchen cabinets.
3. Clever Positioning of Appliances
Once you’ve chosen the right appliances, they need to be carefully placed to improve efficiency. You do not want to end up walking from one end of the kitchen to the other several times.
There are different layout options that work well in a single-walled kitchen:
Option 1
It may be best to go for an arrangement where the sink is placed in the centre of the kitchen. In that way there will be countertop space on either side of it.
The refrigerator can be placed as a stand-alone on one end of the room if the wall length is not too large. Otherwise it should be placed closer to the centre.
The oven and hob should be installed within the island, which will be parallel to the sink.
In this way you would have an efficient workflow as you would have established a working triangle.
Option 2
If a kitchen island is not a feasible option, this may be the best layout for the appliances.
The refrigerator can be placed at the far end, with a sink right next to it and worktop space on each side.
Beneath the sink you can place a dishwasher.
The oven and hob can be placed on the other side.
Option 3
At the further ends of the kitchen you could have tall units.
In these units there can be the oven in one side, and the fridge freezer in the other.
4. Add a Focal Point
If you're aiming for a simplistic design, you may want to incorporate a focal point to showcase in your kitchen.
This will make your kitchen look more inviting and cosy.
Common options include a stone feature, a bold coloured feature wall such as a splash back, or some statement shelving.
You'll be amazed at the difference such small details make, and it'll help draw attention away from the otherwise plain design that the kitchen may need to be constrained to.
5. Add Some Open Shelves
You could add some open shelving within the frame of the kitchen itself, to move away from a design that is made up solely of cabinets.
6. Appropriate Cabinets
Your choice of cabinets are a key element in a kitchen.
Certain cabinetry styles look better when used on a single wall. These include:
Minimalistic Cabinets
Minimalist style cabinets achieve a look that is ideal for a single-walled kitchen.
The sleek lines promote an efficient look, which also increases storage space.
These cabinets are very popular with those who prefer modern styling, an all-white or open concept.
They also help the room to feel bigger, brighter and more spacious.
Rustic Cabinets
Rustic themed kitchens can still look fabulous if you adopt a single walled layout.
It's highly recommended to utilise crafted wood for different elements in the room, including the cabinets, the drawers and the flooring.
You will love the warm look this brings to your kitchen.
Retro Style
A retro style is another great look for a one-walled kitchen.
The single line counter looks great and it is a neat choice for those who prefer a simplistic design.
7. Colour Palette
Colour choices are of utmost importance in any kitchen. You want to choose a colour that makes the room look spacious and bright.
These are some of the best options when it comes to a single wall kitchen.
Classic White
White was, and remains, a very popular colour choice for kitchens. The bright and clean look that a white kitchen achieves is incomparable.
Your room will look airier and more open. So this is the perfect choice for those who are worried their kitchen is too small and may feel cramped.
Vibrant Bold Colours
If you want your kitchen to look and feel warm, opt for vibrant colours.
Cheerful and bright colours such as green and yellow can make a kitchen look truly fabulous.
These colours are generally complemented by some neutral tones to make the kitchen look more open, despite the fact it's spread along a single wall.
Monochrome
A great choice for those who want a minimalistic, clean-looking kitchen which is modern in style.
Two-tone lack and white units and countertops complement one another beautifully in a kitchen.
Sometimes you will find greyish backgrounds or features added in too.
Advantages of a single walled kitchen
A single walled kitchen offers various advantages.
- It is a more affordable option.
- With fewer units you can achieve a more efficient workflow.
- Everything is within reach.
- The space available is used well, and there is no loss of space as in the case of huge corner cupboards, which are difficult to access.
- It is a more sociable layout that promotes an open-plan arrangement.
- Increases a sense of openness in the room.
Disadvantages of a single walled kitchen
Unless it is properly designed, a single walled kitchen could pose some drawbacks;
- Lack of counter space since a good percentage of it needs to be taken up by the sink and appliances.
- Certain activities and tasks are more efficiently done if there is an adjacent worktop available.
- More prone to clutter.
Possible solutions
These problems can be overcome:
- By including a kitchen island so as to add more worktop space.
- You could also use pullouts and pan drawers for more storage space.
- Door storage racks can be very useful.
- Store certain supplies or items in stackable containers to make the best use of the space available.
- Opt for tall cabinets that reach to the ceiling to use wall space efficiently.
- Purchase compact appliances.
Conclusion
These are just some tips and tricks, which can help make your single wall kitchen look truly unique and fabulous.
At the end of the day, you can be as original and innovative as you want to be as the kitchen is the heart of your home, and it deserves to look and feel great regardless of its size or layout.

