Easy DIY Projects: How to Build a Plywood or MDF Step Stool
Author Chigwell Building & Joinery
Date 09/12/16
A simple step-by-step guide to making a robust and handy step stool
No matter how tall you are, there’s always something in the house that’s either out of reach or too high to grab. Accidents in the home are extremely commonplace and falls are amongst the highest incidences that occur. An rickety chair or use of an unstable object can quickly lead to a slip or collapse under your weight and before you know it, you’re being rushed to the emergency room to check for broken bones due to a nasty fall.
Yet the construction of a simple, compact, lightweight and sturdy step stool could be all you need to solve those common problems of reaching objects safely and securely without the risks of doing yourself harm or having to go and grab a bulky step ladder from the garage outside.
Materials
All you need is approximately a 1/4 of a full-sized plywood board or sheet of MDF and you should have enough material to make the stool. Ideally, the thicker the board, the better. We recommend 12mm (1/2”) plywood or MDF minimum, however 18mm is ideal for a studier frame. That way, the finished piece will be stronger and won’t warp or bend under pressure.
To build the step stool, you’ll need a box of 1 - 1.25” self-tapping wood screws, a jigsaw (or circular saw) and an electric screwdriver (or regular screwdriver).
The Build
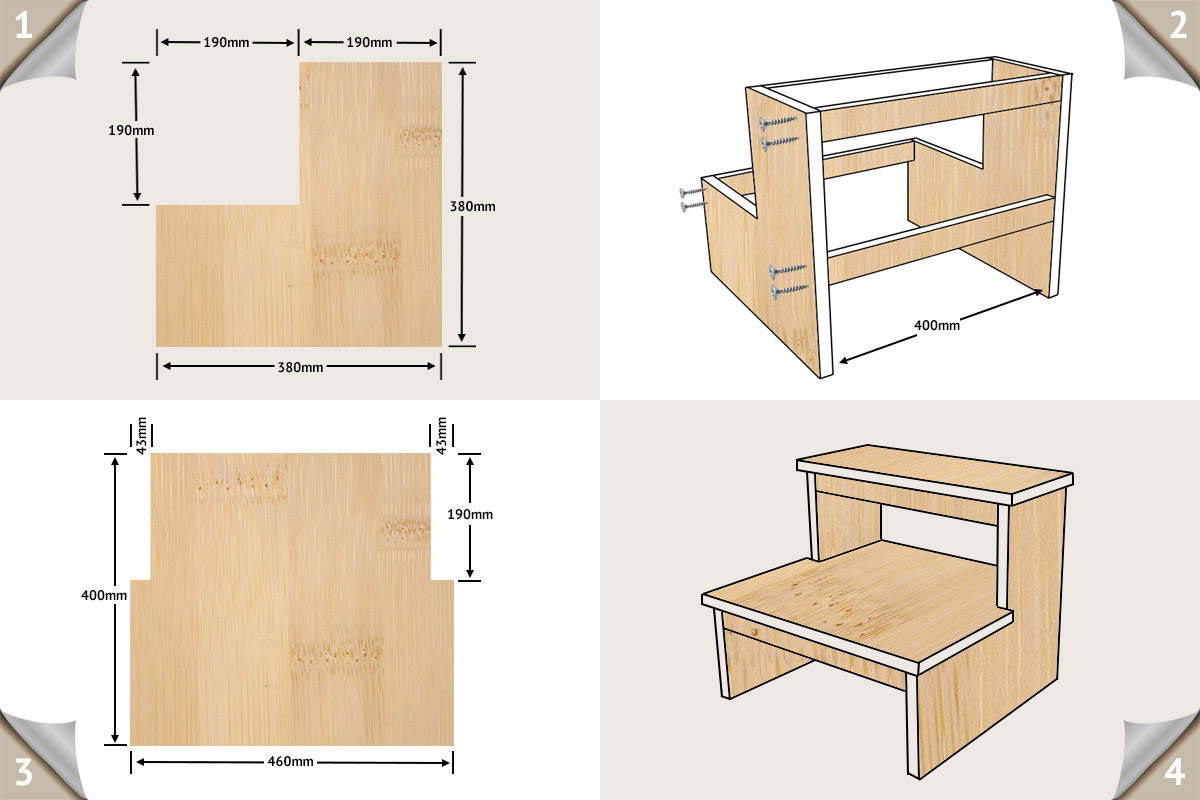
Firstly, you’ll need to cut out two L-shaped sides from a square piece of plywood or MDF that is approximately 380mm (15 inches) in length and depth (see Fig. 1) - the same dimensions both sides and then remove block that is one quarter of the size to create the L-shape. This block should be approximately half the length and depth of your main square piece so should measure 190mm x 190mm (7.5” x 7.5”).
Next, you’ll need to cut four batons of equal length to connect both your L-shaped plywood or MDF panels together which will start to form your frame (see Fig. 2). Each baton should be 400mm (15.75”) in length and 50mm (2”) in depth.
Position the batons as shown in the diagram and attach using a combination of wood glue and two self-tapping wood screws at each end through the sides of the L-shaped pieces. If you are skilled at wood work, you could alternatively, attempt to make jig holes in your batons which will hide screw-heads better and make the finished item look more professional. When done, you should have your basic frame assembled.
Next, cut your top step piece with a jigsaw (or circular saw) at a size of 460mm (18”) in length by 230mm (9”) in depth to allow for plenty of overhang and attach to the top step of your frame using screws through the surface into the batons below (See Fig. 4). If you're feeling confident, you could even cut out a carrying handle shape on the top step to make your stool nice and easy to move and store away.
Finally, we need to cut and attach the bottom sheet to your step-stool. Firstly, cut a piece of plywood sized 400mm (15.75”) in length and 460mm (18”) in width. Now we need to trim the edges halfway to allow for the step to slide and fit snugly inside the frame and then overhang at the front. To do this, you’ll need to cut both edges of your bottom piece 43mm (1.67”) in depth and 190mm (15”) in length to create a fat T-shaped piece (see Fig. 3).
Once cut, the thin edge of your sheet should then slide into the back of the lower step of your frame, allowing you to attach it with screws and wood glue (See Fig. 4). Congratulations, you should now have a finished step stool!
Finishing
If you want to give your step stool a quality finish, give it a light sand with a thin coarse sandpaper, especially along the cut lines to remove any sharp edges or splinters and then you can either stain it with some good quality wood varnish or paint it with furniture paint.

